skip to main |
skip to sidebar
Sometimes I have a dynamite recipe that I want to share, but nothing earth-shattering to say about it. No nostalgic recounting of an event in the kitchen of my youth; no profound connection between the recipe and recent goings-on in my life. No convenient seasonal connection or association with far-flung lands. Just a delicious recipe. This is one of those times. What I have today is just a recipe. A simple recipe for cookies. Cookies that are crumbly and velvety and melty, but that have nothing groundbreaking to say and harbor no clever metaphor or life lesson. What they lack in inspiring gravitas, however, they make up for in butter and toasty, crispy, teased-with-a-pleasing-hint-of-bitterness walnuts.

These cookies are technically called cream cheese-walnut cookies, but I prefer to call them walnut shortbread. They are shortbready in that awesome shattering-with-butter way that brings a tear of joy to my eye as only shortbread can. The toasted walnuts emerge from the buttery crumb, wedged perfectly in the cookie, asserting their own nutty selves. It is a match made in heaven: butter fat with walnut oil. I'm kind of drooling a little right now as I write this.

Thankfully this recipe makes two logs of dough -- one you can bake right away and share with family and friends. You can even take some of them to your dog's vet's office, as I did, because vets deserve treats for safeguarding our best friends. You can then freeze the second dough log and save it for a rainy day: tuck it under your arm and take it over to a friend's house for fresh-baked cookies when they're least expected; or wait until you have to write about them, start to drool, then realize you still have the second log in the freezer, just waiting to be sliced and baked.

Some for now, some for later. Not necessarily profound, but always delicious.

++++++
WALNUT SHORTBREAD
Adapted from Martha Stewart Living
4 c. all-purpose flour
1 1/4 t. kosher salt
1 lb. (4 sticks) unsalted butter, at room temperature
6 oz. cream cheese, at room temperature
1 1/4 c. sugar
2 T. plus 1/2 t. pure vanilla extract
2 1/2 c. walnut halves (1 1/2 c. toasted and chopped, 1 c. finely chopped)
Preheat the oven to 325 degrees Fahrenheit. Line two baking sheets with parchment paper or a Silpat; set aside.

Place 1 1/2 c. of chopped walnuts on a third baking sheet and toast until brown and aromatic, 6-8 minutes. Remove the walnuts from the oven and set aside.
Whisk together the flour and salt in a large bowl; set aside.
Place butter and cream cheese in the bowl of an electric mixer fitted with the paddle attachment. Mix on medium speed until pale and fluffy, about 2 minutes. Mix in the sugar and vanilla. Reduce the speed to low and add the flour mixture. Mix until just combined; do not over-mix. Add the toasted walnuts and mix until just combined.
Transfer dough to a clean work surface and divide in half. Shape each piece into a 8 1/2-inch-long log, about 2 inches in diameter. Wrap each log in parchment paper and freeze until firm, about 30 minutes. (If you are going to freeze one of the logs for baking at a later date, wrap it in the parchment followed by two layers of plastic wrap.)
Preheat the oven to 350 degrees Fahrenheit. Remove one log from the freezer and roll in the remaining 1 c. finely chopped walnuts, coating completely. Cut the log into 1/4-inch rounds. Transfer the rounds to the prepared parchment-lined baking sheets.


Bake, rotating halfway through, until the cookies are just golden around the edges, 18-20 minutes. Do not over-bake! Transfer to wire racks and let cool completely. Repeat the process with the remaining dough on cooled baking sheets (or freeze the remaining dough until later).

Consume, preferably all in one sitting. Forget what I said earlier about sharing them with your dog's vet.
Makes about 4 dozen cookies.
++++++
Previously, on A Stove With A House Around It:
One year ago: French bread
Two years ago: sibling rivalry chicken noodle soup
 There is something really, really awesome about the Australian Football League. The rules are nearly impossible to grasp, especially to a foreigner like me. (It's not as incomprehensible as cricket, but it's close.) The players tackle each other with abandon, yet nobody wears helmets or pads. The field is elliptical, and there is something called a "behind" which is worth fewer points than a goal. To figure the final score, one has to do math. ("As an example of a score report, consider a match between St Kilda Football Club and the Sydney Swans. St Kilda's score of 15 goals and 11 behinds equates to 101 points. Sydney's score of eight goals and ten behinds equates to a 58 point tally. St Kilda wins the match by a margin of 43 points. Such a result would be written as 'St Kilda 15.11 (101) defeated Sydney Swans 8.10 (58)' and said 'St Kilda fifteen eleven, one hundred and one defeated Sydney Swans eight ten, fifty-eight.'" Solve for x to determine how many behinds your team scored.) The players wear tall socks, often striped. Their supporters sit in the stands wearing fashionable scarves in team colors. And the most crazy business of all? If the teams tie -- even in the Grand Final -- they play a rematch a week later.

So last week, my dear friend Nate's beloved St. Kilda Saints played their hearts out in the Grand Final, only their seventh appearance in the final in their 113-year history. They've only won once, in 1966 (reminds me of a certain Cleveland baseball franchise). And true to the madness of AFL, last week the Saints came from behind, scoring enough behinds, to force a tie against the hated Collingwood Magpies. (The last time there was a tie was in 1977.) It was a freaking awesome game, with a shocking result that left the 100,016 people in the Melbourne Cricket Ground totally silent. And Husband and I were sitting here in Ohio, in the middle of the night, watching the game live and eating homemade meat pies.

Because when you're watching a quintessentially Australian sport, you want to be eating a quintessentially Australian snack. (And drinking a quintessentially Australian beer.) Though my homemade pies were not exactly the same as, say, a Harry's pie, they were a perfectly serviceable and totally delicious approximation. And if you don't mind rolling out shortcrust pastry at midnight, you can even make them to enjoy during the few live footy matches that ESPN airs in this country. The best part of all: the recipe makes eight pies, so you just might have a few left over that you can stash in the freezer, unbaked, to whip out the next week in the event of a Grand Final rematch.

Go Saints!
++++++
HOMEMADE MEAT PIES
Adapted from Delicious. magazine; shortcrust pastry from The Cook's Companion, by Stephanie Alexander
I made half of these pies with ground beef and beef stock, and half with ground turkey and chicken stock. And, OK, so I've never seen a turkey pie in Australia. But I don't eat beef (for the most part), and I did a little substituting. Please don't revoke my imaginary Australian passport.
Note: apologies for the strange measurements. I had to convert from metric.
One more note: you'll need 8 disposable pot pie tins for this recipe. I find mine in the baking aisle of the supermarket.
For the shortcrust pastry:
16 1/2 oz. all-purpose flour
Big pinch of kosher salt12 1/2 oz. unsalted butter, chilled
1/2 c. water
Sift the flour and salt directly onto a work surface. Using a box grater, grate the chilled butter into the flour mixture (or you can chop the butter into small pieces and add it to the flour mixture, but honestly, it's randomly fun to grate butter). Toss the butter pieces lightly in the flour, lightly rubbing to combine partly.

Make a well in the center of the flour mixture and pour in the water. Using a pastry scraper, work the water into the flour until you have a very rough heap of buttery lumps of dough. Using the heel of your hand, smear the pastry away from you across the workbench; this will slowly bring the dough together. (It does work; be patient.) Don't knead the dough, you want to just bring it together. Kneading it will develop the gluten too much and create a tough -- instead of tender and flaky -- pastry.

Divide the dough in half and form each half into a flat disc. Dust the discs with a little flour and wrap with plastic wrap. Refrigerate at least 20-30 minutes, or until ready to use.

For the meat pies:
1 T. vegetable oil
1 onion, finely chopped
1 garlic clove, minced
1 lb. ground beef
1/4 c. all-purpose flour
1 1/2 c. beef stock
1/4 c. tomato puree
2 1/2 T. Worcestershire sauce
1 T. soy sauce
1/2 t. dried parsley
1/2 t. dried thyme
1/2 t. dried oregano
4 sheets store-bought puff pastry
1 batch shortcrust pastry (recipe above)
1 egg, beaten
Ketchup (optional), to serve
Your favorite mashed potatoes (optional), to serve

Heat the oil in a large skillet over medium heat. Add the onion and cook for 5 minutes, stirring often. Add the garlic and beef and cook for an additional 15-20 minutes until the meat has completely browned. Stir in the flour and cook for 2 minutes. Add the stock and stir to deglaze the pan. Add the tomato puree, Worcestershire sauce, soy sauce and dried herbs. Cover and cook for 15 minutes, stirring often to break up any large lumps of meat. (If the pan gets too dry, feel free to add a little more stock.) Set aside to cool completely.
Preheat the oven to 375 degrees Fahrenheit. Using the circumference of the pot pie tins as a guide, cut 8 rounds of the puff pastry dough. Set aside.
Roll out the shortcrust pastry to about 1/4-inch thick, flouring the work surface and the rolling pin as needed to prevent sticking. Turn over one of the pot pie tins onto the dough and cut about 1 inch beyond the tin's circumference with a knife. Place the shortcrust pastry round into the pot pie tin, then repeat with the remaining 8 pies. (You might have to re-roll the pastry scraps; this is fine but try to be as gentle as possible with the dough to avoid over-working it.)

Add the meat to the pies, filling them to the top.

Top the pies with the reserved puff pastry rounds, pinching round the edge to seal as best as possible. Brush the pies with the beaten egg then, using a paring knife, cut a small slit in the top of each pie to allow it to vent in the oven.

Place the pies on baking sheets and bake for 25 minutes until golden.
Serve with a few scoops of mashed potatoes and a little ketchup on top. Then, watch the footy.

Makes 8 pies.
++++++
Previously, on A Stove With A House Around It:
One year ago: oregano baked chicken dinner
Two years ago: zatar crackers with ful medames
This is my reality right now:
(1) The garden, which Husband planted and maintained during my pregnancy this summer, is overflowing with gorgeous ripe tomatoes and tiny but flavorful red and yellow onions.


(2) My eyes always seem to be bigger than my stomach, and I purchase more delicious crusty bakery bread than we can eat before it gets stale.
(3) I like to cook with things I have on hand, things which will go bad otherwise. It makes me feel frugal, and wise, and enterprising.
(4) I don't have a hell of a lot of time to cook at this very moment.

You can imagine my pleasure, then, when it occurred to me that I could make a very quick and very delicious dinner using nothing more than our tomatoes, our onions, our back porch basil and that half-loaf of rustic bread that's been sitting on the counter since last Friday. It hit on all four of my current realities beautifully: made entirely of produce we grew ourselves (I say "we;" I should say "Husband"), a way to tastily salvage the stale bread and use ingredients on hand and, finally, fast. I made it while the baby slept, nary a peep escaping his teeny lips before the meal was complete.

Now if I had made this salad using a loaf of my own home-baked bread, my head might have exploded. But I'll have to save that thrill for another time.

++++++
TOMATO AND BREAD SALAD WITH RICOTTA
Adapted from Everyday Food magazine
I could call this "panzanella," but I am not full-time fancy.
Half a loaf of day-old crusty bread (about 1/2 lb.), cubed into large chunks
About 2 lbs. of fresh tomatoes, cubed into large chunks
1/2 a large (or 1 small) red onion, sliced thinly
3 T. red wine vinegar
3 T. olive oil, plus more for drizzling
Sea salt, to taste
Freshly-cracked black pepper, to taste
1 c. fresh basil leaves, torn or chopped roughly
15 oz. ricotta cheese
Preheat the oven to 375 degrees Fahrenheit. Place the bread cubes on a baking sheet (with NO oil) and bake until browned, 15-20 minutes. Set aside.

In a large bowl, combine the tomatoes, onion, vinegar, oil and salt and pepper to taste. When the bread has cooled, add it to the tomato mixture along with the basil. Stir to combine, then let sit for about 15 minutes to allow the tomato juices to soften the hard bread cubes.

Serve with a few spoonfuls of ricotta cheese, a drizzle of olive oil and a little more salt and pepper to taste.
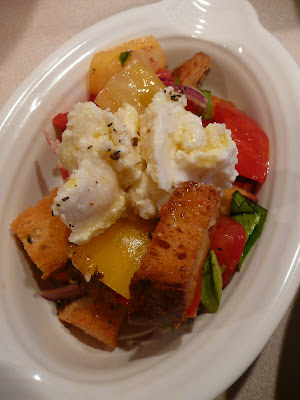
Serves 6.
++++++
Previously, on A Stove With A House Around It:
One year ago: I was eating damper bread with golden syrup in the Northern Territory
Two years ago: roasted tomato marinara
I don't know in what convoluted world I live, but cooking and blogging were nearly impossible feats while I was pregnant. However, now that I am the mother of a newborn, well, cooking remains elusive but the ability to blog has somehow reappeared. I shall not question why -- when (in retrospect) I had all the time in the world -- I couldn't update this space to save my life, but now that I can't find time to eat a peach I can somehow write about corn ice cream. Mysteries, all of it.

First, the news: I am absolutely thrilled to announce the arrival of my son, Michael, who entered this world in search of a good meal on August 18. He has a full head of dark hair, and something that the Cleveland Clinic nurses referred to as a "lusty" cry. He is a tiny peanut, and I cannot believe that he is finally here. To celebrate his arrival, I would like to share the dessert I made for his father's birthday this past July 4.

The blueberry-corn ice cream sundae seemed the perfect treat for someone born at the height of summer. Blueberries are in season, ripe and lovely, get them before the birds eat them off the bush. The corn, at least in these parts, is "knee-high by the 4th of July," with early sweet crops making their way to market at local farms. I couldn't think of a better or more unique confection with which to celebrate Husband's birthday. How I managed to make the component parts from scratch while large in girth and slow on my feet from advancing pregnancy I'll never know. Suffice it to say: the blueberry-corn ice cream sundae is love, and I love Husband.

As the warm summer days begin to wane, take advantage of the markets before they close for the season and stock up on some corn and blueberries. Then spend a day or so puttering about in the kitchen, making corn ice cream and blueberry compote. Finally, invite over some people whom you really love. Dish up this creamy yellow and purple layered gorgeousness in a tall parfait glass and toast, well, whatever. Someone's birthday. Labor Day. The imminent return of Glee. You could even toast your own awesomeness at making corn ice cream. Whatever it takes.
For us, with our corn ice cream still left in the freezer, we'll be toasting Michael.

++++++
BLUEBERRY-CORN ICE CREAM SUNDAES
Adapted from Nancy Olson, Gramercy Tavern
Note: the ice cream base has to chill overnight before being placed in your ice cream maker, so please plan accordingly.
For the sweet corn ice cream:
6 c. fresh sweet corn kernels (from about 6 ears), cobs reserved
4 c. milk
2 c. heavy cream
6 T. light corn syrup
1 vanilla bean, split and scraped
1 1/8 c. sugar
12 large egg yolks
1 1/2 t. pure vanilla extract
1/2 t. kosher salt
For the mini cornbread muffins (optional, for garnish):
3/4 c. all-purpose flour
1/2 c. fine yellow cornmeal
1 1/2 t. baking powder
1/2 t. kosher salt
1/4 c. sugar
2 T. unsalted butter, at room temperature
1 T. honey
1 T. pure maple syrup
1 large egg
1/2 c. milk
1 1/4 c. fresh sweet corn kernels (from about 1 1/2 ears)
2 t. turbinado sugar
For the blueberry-corn compote:
2 1/2 c. blueberries
1/4 c. + 2 T. sugar
1 1/4 c. fresh sweet corn kernels (from about 1 1/2 ears)
For the toffee popcorn:
1/3 c. sugar
3 T. unsalted butter, plus more for bowl
About 6 c. popped popcorn (go for an unbuttered/unsalted variety if using microwave popcorn)
2 T. light corn syrup
1/4 t. pure vanilla extract
1/4 t. kosher salt
For the black pepper whipped cream:
1/3 c. heavy cream
1 t. powdered sugar
1/8 t. freshly-ground black pepper
At least one day before you wish to serve the sundaes, make the ice cream. Set a large bowl in an ice-water bath; set aside. In a large saucepan, bring the corn kernels, corn cobs, 3 1/2 c. of the milk, heavy cream, corn syrup, vanilla bean seeds and pod and sugar to a boil over medium heat. Cook, stirring, to prevent the sugar from sticking to the bottom of the pan.


In a large bowl, whisk together the egg yolks and remaining 1/2 c. milk until well combined. Remove the corn mixture from the heat; slowly add about 1/3 of the hot corn mixture to the egg yolk mixture, tempering them, whisking well to combine. Pour the egg mixture back into the saucepan with the corn cob mixture, stirring constantly. Return the saucepan to medium-high heat. Stirring constantly, cook until this custard mixture coats the back of a wooden spoon, 4 to 5 minutes. Stir in the vanilla extract and salt.
Pour the custard mixture into the bowl set over the ice-water bath; let cool completely. Transfer the custard mixture to the refrigerator and chill overnight.
The next day, remove the corn cobs from the custard mixture, squeezing them well to extract as much liquid as you can. Discard the cobs.

Transfer the custard mixture to the work bowl of a food processor; process until smooth. Strain through a fine wire mesh strainer, discarding solids.

Transfer the custard mixture to an ice cream maker and freeze according to the manufacturer's directions. Keep the ice cream frozen in an airtight container until ready to use.
If using, make the mini cornbread muffins. Preheat the oven to 350 degrees Fahrenheit. Butter 20 1/4-cup muffin tins; set aside.
In a medium bowl, whisk together flour, cornmeal, baking powder and salt; set aside.
In a large bowl, mix together sugar and butter; stir in honey and maple syrup until well combined. Add egg and continue mixing until well combined. Alternately add flour mixture and milk to sugar mixture, mixing well after each addition and beginning and ending with the flour mixture. Stir in corn kernels until just combined.
Fill prepared muffin cups 3/4 full with batter; sprinkle tops with turbinado sugar. Transfer to oven and bake until tops are golden brown, about 14 minutes. Let cool slightly in pans before removing and cooling completely on wire racks. Store in an airtight container until ready to serve alongside the ice cream sundaes.

Next, make the blueberry-corn compote. Place 1 1/2 c. blueberries and sugar in a medium heavy-bottomed saucepan and cook over medium-high heat, stirring constantly and pressing on berries until they burst and the mixture begins to look syrupy. Add corn kernels, stir to combine and immediately remove from heat.

Stir in the remaining cup of blueberries. Transfer to an airtight container and refrigerate until cool, up to 24 hours.
Make the popcorn. Line a baking sheet with a Silpat; set aside. Butter a large bowl and add popped popcorn; set aside.
Heat sugar, 3 T. butter and corn syrup in a medium heavy-bottomed saucepan over low heat until butter and sugar melt. Increase heat to medium and cook, stirring, until sugar mixture becomes golden brown. Remove from heat and carefully add vanilla and salt, taking care because the mixture may splatter slightly. Pour the sugar mixture over the popcorn and stir quickly until popcorn is coated.
Turn the popcorn out onto the prepared baking sheet, working quickly to separate kernels as much as possible. Let cool completely. Transfer popcorn to an airtight container until ready to use, up to one week.

Make the whipped cream. Place all whipped cream ingredients in the bowl of an electric mixer fitted with the whisk attachment. Whisk until soft peaks form. Transfer to an airtight container and refrigerate until ready to use.
FINALLY! Assemble the ice cream sundaes. Place two spoonfuls of the blueberry-corn compote into a large parfait glass. Top with two scoops of corn ice cream. Add a handful of toffee popcorn to each glass and top with another scoop of ice cream. Top with another spoonful of compote and a dollop of whipped cream. Garnish with a little more toffee popcorn and a mini cornbread muffin; serve immediately.

Makes 6 sundaes, with some corn ice cream left over for good measure.
++++++
Previously, on A Stove With A House Around It:
One year ago: English muffins
Two years ago: homegrown tomato salad with feta and cracked black pepper
Well hello there.
It's been awhile. A long while. Life -- and this ever-increasing belly of mine -- keeps getting in the way of cooking and, by extension, blogging. But I have so much to tell you about, and so much deliciousness to share. After my firstborn makes himself known to the outside world (and maybe even sooner, if I get some energy), I will be telling you all about my three baking classes with Bread Baker's Apprentice author Peter Reinhart. I'll be sharing some delicious granola and an Australian Weet-Bix slice courtesy of dear friends Kerrie and Barbara, respectively. I might even discuss the birthday treat I'm planning on making for Husband this Sunday, as he -- and our fair nation -- grow one year older.
But until then, I remind you of this: the American flag cake. An oldie but a goodie. I figure some of you out there might be searching for a 4th of July sweet that doesn't necessarily involve a carefully-placed matrix of blueberries and strawberries that resembles the stars and stripes (not that there's anything wrong with that).
If you're so inclined in the next few days, get to baking this showstopper of a cake. And enjoy the fireworks!
Happy long weekend, everyone.

I don't know about you, but this seems to happen a lot in our house:

We begin with the best of intentions. We want more fresh fruit on hand, to encourage healthy snacking. Husband wants bananas available for necessary post-run fuel. They're good for smoothies. So we buy five or six of them, then they inevitably linger, uneaten on the counter top, turning from lovely green-tinged yellow to gently speckled brown to black in the time it took me to write this sentence.
Then I make matters worse by getting up on my Tasteful Decor Horse, placing the bananas in a pretty frosted yellow glass dish on the shelf above the stove. Out of Husband's line of sight. And we all know that when something is out of Husband's sight, it is out of Husband's mind. Unless that something is Howard Stern. Or Mr. Met. Or greasy Chinese food from Rockland County, New York.
This rotten parade of banana flesh has been therefore enriching our compost pile. I often think that I should bake something (muffins, dog treats) with the darkening fruit, but I always end up missing the window as the bananas go from perfect-for-baked-goods to liquefied before I can get out the mixer.
Sunday night, though, I was victorious.

While mentally preparing for the series finale of "Lost," I happened to glance at the bananas, which I had moved from their stylish perch atop the stove back to their utilitarian counter top real estate. I was really tired, and I think I was mid-sentence talking about how tired I was, but I got up, walked across the room, grasped the bananas and started peeling them. I was determined to have freshly-baked banana bread -- made from not-wasted bananas -- in my hand before I learned if Jack had the ability to kill the Man in Black.
I can't help but think that if the Smoke Monster had some of this banana bread, studded with toasted pecans and flakes of sweetened coconut, maybe he wouldn't have been so cranky.

++++++
BANANA BREAD WITH COCONUT AND PECANS
Adapted from More From Magnolia, by Allysa Torey
Baked in a tube pan, this banana bread can also pass for cake, especially if served with a little ice cream or homemade whip cream. Personally, though, I like it sliced in thin pieces, toasted and spread with salted butter. The breakfast of champions.
ALSO: This bread is even better with chocolate. So if you're feeling it, add in some (8 oz. or so) chips or chunks of your favorite chocolate when you stir in the coconut and pecans.
3 c. all-purpose flour
1 1/2 t. baking soda
3/4 t. cinnamon
3/4 t. kosher salt
3/4 c. canola or vegetable oil
1 1/2 c. sugar
3 large eggs at room temperature, well beaten
1 1/2 t. vanilla extract
1 1/2 c. mashed ripe bananas (about 4 bananas)
3/4 c. sour cream
1 1/2 c. pecans, toasted and coarsely chopped
3/4 c. sweetened shredded coconut
Preheat the oven to 350 degrees Fahrenheit. Place the chopped pecans on a baking sheet and bake until toasty brown, 7-8 minutes (be careful not to burn them). Remove from the oven and let cool. Keep the oven at 350.
Grease and lightly flour a 10-inch tube pan.
In a medium bowl, sift together the flour, baking soda, cinnamon and salt. Set aside.
In the bowl of an electric mixer, beat together the oil and sugar. Add the eggs and vanilla, and beat well. Add the bananas and sour cream, and mix well. Add the dry ingredients and mix until just combined. Stir in the pecans and coconut.

Pour the batter into the prepared pan and bake for 60-70 minutes, being sure to check after 60 minutes to ensure that it's not over-baked. (A skewer inserted into the center of the bread should come out with moist crumbs attached.) Let cool in the pan for at least 1 hour before removing from the pan and serving.

Makes one 10-inch cake/bread.
++++++
Previously, on A Stove With A House Around It:
One year ago: Christopsomos
Two years ago: Indian tacos, breakfast-style
As I noted last time, you can't just have guacamole for dinner.
I mean, you could. But what fun would that be? Guacamole is a gateway concoction, an excuse, if you will, to consume any manner of complementary Mexican treats. Mexican treats like tacos.

I've been on some type of taco/taquito bender of late. I blame a trip that Husband and I took to Chicago in March, during which time we ate a magnificent meal at Rick Bayless's perfect and delicious Frontera Grill. Rick's taquitos de pollo ahumado were simply bewitching and I still think about them a little each day. The ingredients are simple (smoked chicken, black beans, poblano chiles, homemade sour cream, salsa verde, anejo cheese, guacamole) but Rick is an alchemist, I swear: he somehow transforms the simplest foodstuffs into creations that, well, are still on your mind months later. Remember this alchemy, for in a paragraph or two I'm going to bring it up again.
Back home from Chicago, I began seeking a local taquito that could scratch my Frontera itch. I remembered Momocho, a Cleveland restaurant known for its "mod mex" cuisine that had been on my to-try list for some number of years. A random night a few weeks ago I decided I could wait no longer. Husband looked at the menu online and I was half-way out the front door as soon as he mumbled the word "taquito." Between chef Eric Williams's goat cheese guacamole (holy hell) and the Mexican fighting masks leering down at my empanada from the restaurant's dimly-lit walls, I knew I had found a new favorite place to eat. And the taquitos, lord, the taquitos. I had the tinga (16-spice grilled chicken) and Husband had the machaca (coffee- and ancho-braised brisket). It is embarrassing, but as I am typing this I am drooling a little bit, Pavlov-style. I know: classy.
So if I can't get to Frontera Grill, I can get to Momocho. And if I can't get to Momocho, I can get to my kitchen. Because thanks to the glory that is the Rick Bayless cookbook empire, his Authentic Mexican includes a simple recipe for crispy tacos that are easily whipped up, even on a weeknight, to sate the most voracious of taco and/or taquito appetites.

Remember what I said about alchemy? The filling for these tacos is nothing more than shredded chicken, salt and a puree of roasted tomato, red onion and garlic that has been cooked and thickened in a cast-iron skillet. And yet, it is amazingly delicious and complex, and completely belies its humble component ingredients. Which is to say: the chicken filling for these tacos has no right or reason to be as tasty as it is, but it is, nevertheless, completely beguiling. No wonder Mr. Bayless is doing so well for himself.
And no wonder I've been eating so well.
++++++
CRISPY CHICKEN TACOS
Adapted from Authentic Mexican, by Rick Bayless
I've made these tacos with flour and with corn tortillas, and I must say I prefer the corn. That said, if you only have flour tortillas on hand, go for it. The filling is so good it doesn't matter what you wrap it in, short of a piece of aluminum foil or a Sham-wow. I serve the tacos with no small measure of guacamole and a sprinkling of feta cheese (I can't find queso anejo or queso fresco around here), though Rick also suggests serving them on a bed of romaine leaves with sliced radishes and thinned sour cream.
Note also that the chicken filling can be made a day in advance and stored in an airtight container in the refrigerator.
Finally, Rick fries his assembled chicken tacos, but I choose to bake them. They get just as crispy and are a little less greasy.
1 ripe, large tomato4 boneless, skinless chicken breasts
1 t. kosher salt, divided
1/2 t. freshly-cracked black pepper
2 T. + 1 T. + 1/4 c. vegetable oil, divided
1/2 a medium red onion, coarsely chopped
1 clove garlic, roughly chopped
12 corn tortillas
About 1 1/2 c. guacamole
1/4 c. crumbled feta cheese (or queso anejo or queso fresco, if you can find it)
1/2 c. sour cream thinned with 2 T. milk (optional)
Preheat the oven to 325 degrees Fahrenheit.
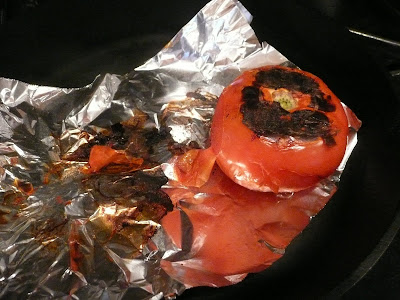
Place a piece of aluminum foil in a cast-iron skillet (or other large skillet). Over medium heat, place the whole tomato on the foil and roast it, turning often, until the skin is blackened. Remove the tomato from the foil and place on a plate to cool enough to handle it. Peel the tomato, then core and roughly chop it. Set aside.
Season the chicken breasts on both sides with 1/2 t. of the kosher salt and the black pepper. Heat the same cast-iron skillet (or other large skillet) over medium-high heat. Place 2 T. of the vegetable oil into the skillet and then add the chicken breasts. Cook about 6 minutes per side, until the chicken breasts register 161 degrees Fahrenheit on a probe thermometer. Remove the chicken to a plate and allow it to cool enough to handle it. Shred the chicken into bite-sized pieces.
Place the chopped roasted tomato, red onion and garlic in the bowl of a food processor. Process until the mixture is completely smooth. Heat 1 T. of the vegetable oil in the same cast-iron skillet (or other large skillet) that you used to roast the tomato and cook the chicken. Add the tomato puree to the pan and stir constantly until it is thick and reduced, about 4 minutes.

Stir the shredded chicken into the thickened tomato mixture. Remove from heat and season with the remaining 1/2 t. kosher salt.

Heat the remaining 1/4 c. of the vegetable oil in a small skillet over medium heat. When hot, quick-fry the tortillas one at a time to soften them, 2-3 seconds per side. Drain well on paper towels.

Immediately assemble the tacos by placing about 2 T. of the chicken mixture across each tortilla. Roll up the tortillas and place on a baking sheet, seam side down. Bake the tacos for about 10 minutes, or until crispy.

Serve with guacamole, crumbled feta and thinned sour cream (if desired). I also suggest serving with Luta's margaritas.
Makes 12 tacos.
++++++
Previously, on A Stove With A House Around It:
One year ago: granola
Two years ago: chocolate crinkles


