Monday, May 26, 2008

Nearly every one of those meals involved Indian tacos


Husband and I chose September 3, 2005, as our wedding date for several reasons, chief among them the fact that our anniversary will always fall on or near Labor Day weekend. We will always have a really good reason -- and a few days off work -- to enjoy a long weekend, or an even longer trip. For our first anniversary we took a weekend trip to Toronto and ate the most amazing salty caramel-chocolate dessert that you can imagine. We did lots of walking and shopping, too, but really, for me that trip was all about that cake.

Last year, for our second anniversary, we were able to get away for a week-long trip to Wyoming and South Dakota. Husband's uncle lives near Cheyenne, Wyoming, so we flew into Denver, rented a bitchin' Mustang and visited Cheyenne for a few days. In addition to being a really cool town, Cheyenne possesses some of the best-looking signs I've ever seen.


We then headed north to Devil's Tower before turning east toward Rapid City, South Dakota. We visited Deadwood, where we won $164 in a casino and had an amazing anniversary meal at the Deadwood Social Club above Saloon No. 10.

(Beer goes well with second anniversary gifts.)

We enjoyed Mount Rushmore, where we stayed for the nighttime lighting of the monument -- a moving and beautiful ceremony. We took several trips through Custer State Park (the best-kept secret in the Black Hills!), stopped at kitsch-Mecca Wall Drug and hiked the Badlands. We even went horseback riding. To his delight, Husband rode a horsie named "Hot Dog."

(Aforementioned bitchin' Mustang chills out in the Badlands.)

I could write paragraph after paragraph about this trip, such was the stunning beauty of this part of the world and the unique experiences to be enjoyed therein. But I don't want to pain you, dear reader, with the minutiae of my vacation and thus I shall focus -- for now! -- on one memorable aspect of our trip: the Indian tacos at the Cedar Pass Lodge in the Badlands.

(Clockwise from top left: the view from the Cedar Pass Lodge; the Lodge's welcoming sign; view through the Cedar Pass Lodge restaurant's window; Husband toasts another meal of buffalo.)

There are few places to stay in and around the Badlands. Cedar Pass Lodge, therefore, is an oasis of tiny cabins nestled within the national park's harsh moonscape. We stayed there two nights: the first in a cozy cabin, the second in the property's "cottage," which is a small but very comfortable three-bedroom house. Cedar Pass Lodge has a restaurant, a gift shop and extremely friendly staff. Case in point: knowing full well the limited creature comforts within the Badlands (and the lack of nightlife), Husband and I purchased a six-pack of Corona at a bar in Wall, SD, to take with us to our cabin. Though we remembered to ask for lime slices, we neglected to realize that we did not have a bottle opener. Determined to access our brew, I strolled from our cabin to the restaurant/gift shop building on Cedar Pass Lodge's grounds to see if I could borrow one. The kind staff were hanging out on a picnic bench behind the building, as the restaurant had closed for the evening. Doing one better than lending me a bottle opener, they gave me one from the gift shop that is in the shape of a little buffalo. That is what I call impressive service.

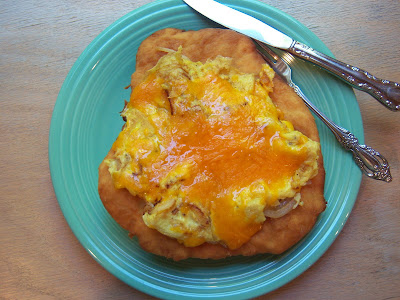
Both of the days we were in the Badlands, we took our meals at the Cedar Pass Lodge restaurant. And nearly every one of those meals involved Indian tacos. Depending on the hour of the day, the Indian taco at Cedar Pass Lodge consists of a delicious piece of fry bread topped with (a) an omelet or (b) ground and spiced buffalo meat. What makes this meal so delicious is the fry bread itself -- which I can best describe as a sort of non-powdered-sugared version of the funnel cake. Though fried in at least an inch of oil, it is nevertheless very light and crispy. Its marginal sweetness is a sensational foil to the salty savory-ness of an omelet or, as Husband tells me, the spicy meatiness of ground buffalo.

(That's fry bread, up there.)

(Indian taco, breakfast-style.)

(Indian taco, buffalo-style.)

At first blush, it would seem -- to me at least -- that the Indian taco would not be very tasty. Oh, to make that assumption is erroneous indeed. I have never been one to enjoy sweet things in my savory, and vice versa. However, I've of late developed quite a taste for salty caramel sauce as an accompaniment to rich, sweet chocolate cake (see: anniversary trip to Toronto) and I can't say I didn't salivate over the lightly sweet fry bread's encroachment on my onion-y, peppery, salty omelet. What can I say; my palate is evolving.

This recipe comes from Cedar Pass Lodge itself; they have little cards printed with the fry bread recipe free for the taking in the gift shop. The fry bread is surprisingly simple to make, requiring little more than a bowl, your hands and about 15 minutes. The most challenging part of this recipe is cleaning up the oil-splattered stove and you just might be able to wrangle someone into doing that for you -- considering that you just made a delicious breakfast from scratch and all.

Even if you don't top the bread with an omelet or ground meat spiced with taco seasonings, the fry bread is well worth making and enjoying on its own. Even so, I do not make Indian tacos with any level of frequency: they are special and evoke a particularly happy time and place in my life and, like all good food with an emotional connection should be, are treated almost reverentially in my kitchen. But it's a long holiday weekend and Husband is home and it just feels like the right time to revisit Cedar Pass Lodge via fried food. Best to celebrate fry bread over Memorial Day weekend, for who knows where our third anniversary trip will take us this Labor Day?


++++++

INDIAN TACOS, BREAKFAST-STYLE
Adapted from the Cedar Pass Lodge's recipe

For the fry bread:

1/4 c. sugar

2 c. flour

1 t. kosher salt

3 t. baking powder

1 c. water, or enough to make a soft dough

Vegetable oil, for frying

For the omelets:

4 large eggs

1 small white or yellow onion, sliced

2 T. butter

1/2 t. kosher salt

1/4 t. freshly-ground black pepper

1/2 c. extra-sharp cheddar cheese, grated

Make the fry bread. Using a whisk, mix together the sugar, flour, salt and baking powder. Add the water and mix with a wooden spoon until incorporated. Turn the dough out onto a well-floured work surface and knead briefly, until the dough comes together and is smooth. The dough is very soft and slightly sticky; add more flour to your hands and work surface as necessary.

Divide the dough in two pieces and flatten into rustic, imperfect round shapes, about 7" in diameter.


Prepare the omelet ingredients. In two separate bowls -- one for each omelet -- whisk together two eggs, 1/4 t. salt and 1/8 t. black pepper. Slice the onions and shred the cheese.


Heat about 1 inch of vegetable oil over medium-low heat until it reaches 350 degrees Fahrenheit.

While the oil is heating, cook the omelets. Melt 1 T. butter in a non-stick skillet. Add half of the sliced onions to the butter and cook until softened, about 3 minutes. Add the egg mixture for one of the omelets and cook until the egg is set. Sprinkle with 1/4 c. shredded cheese; set aside. Repeat for the second omelet.

When the vegetable oil reaches 350 degrees, carefully lower one of the pieces of fry bread dough into the pan. Fry until the bread is golden brown, about 2 minutes per side. Watch carefully, though: the bread can burn quickly. Remove to a wire rack set over a cookie sheet to drain. Repeat with the second piece of fry bread dough.


Assemble the breakfast tacos. Place one piece of fry bread on a plate and top with an omelet. If desired, serve with salsa. Personally, I like mine plain.


It should be noted that, of course, you can add whatever toppings you like to your omelet. I've chosen onions and cheese because that's how they served it at Cedar Pass Lodge, and I like the idea of keeping it simple to allow the tantalizingly crisp and subtly sweet fry bread to shine.

If you would like to adapt this recipe for lunch or dinner, instead of the egg Cedar Pass Lodge recommends browning 1 lb. of buffalo meat or beef, combining it with 32 oz. refried beans and 1-2 packages of taco seasoning. Then spread the meat mixture on the fry bread, topping with cheese, lettuce, tomatoes, guacamole, sour cream and salsa to taste. This also works marvelously with ground chicken or turkey if you, like me, are not so into buffalo or beef.

Makes 2 tacos that are large enough to fuel a strenuous day of hiking in the Badlands. If you are not hiking in the Badlands or, say, plowing fields by hand, you may wish to halve the recipe or use it to feed 4 people.

Thursday, May 22, 2008

There is plenty of room for the subtle, delicate cakes

Though I do not understand why, my father doesn't really have a sweet tooth. He has a pasta tooth, and a steak tooth and a Chivas Regal tooth. But he doesn't have a sweet tooth.

It's a challenge, then, to bake him something he'll truly enjoy for his birthday. Sure, he will have a slice of whatever birthday cake ends up in front of him on May 19, but to make him something he'll really love? That is quite a challenge. The trick is to find a confection that is either (a) not too sweet, (b) includes cherries or (c) approximates something his mother used to make for him.

Sister did a magnificent job this year when she presented him with a pineapple upside-down cake in honor of his 65th birthday. He ate a customary slice, then -- to the delight of Sister -- returned to the kitchen and served himself another piece. Sister wins the prize! It was an amazingly delicious and moist dessert and the brown sugar-crumb topping was crunchy and divine. I am impressed with her mad skillz.


Her Dad-cake success got me thinking about other recipes that would please his not-very-sweet tooth. There's a Ligurian lemon cake with raspberries that I made a few years ago that seemed to hit the spot. He enjoys cassata -- indeed, I chose it as one of the tiers of our wedding cake so that the father of the bride would have something to snack on with his guests. Then I came across Giada De Laurentiis' recipe for almond, pine nut and apricot crumb cake. I thought: this has Dad written all over it.


First, it is Italian. So is Dad. Second, it seems to be only marginally sweet. While Dad is very sweet, he does not like his cakes that way. Finally, it includes a lot of nuts -- a dessert characteristic that's always a win with Dad. So even though his birthday had passed, I gave this cake a shot in the hopes of adding it to the list of Cakes Dad Would Like. Perhaps it will make an encore appearance next May, for his 66th. Or maybe I will just bake it lots of times between now and then for no reason whatsoever. I feel like if you have an almond, pine nut and apricot crumb cake sitting around the house on an ordinary average day -- waiting to be consumed with a cup of coffee in the morning or after a healthy helping of rigatoni with pesto at night -- you are living a charmed life indeed.


This cake has a soft crumb that plays nicely with the crisp, caramelized "crust." The nuts lend a pleasing aroma and texture, asserting themselves through the moist cake. Just like Dad would like it, this cake is just barely sweet enough to be legally defined as a dessert. The nuggets of dried apricot offer the occasional "sugary" burst -- but other than that, the cake is only mildly sweet. It's simple, and surprising and humble. It's a real treat.

Happy belated birthday, Dad. As you get older, I get wiser about the range of delicious but not-cloyingly sweet dessert options out there. Life doesn't have to be filled with rich chocolate confections (though such goods do have their place). There is plenty of room for the subtle, delicate cakes that rely on dried fruit, nuts, even pine nuts for their unique texture and complex flavor. All along I thought you were crazy and/or stubborn about your dessert attitude. Turns out, you are actually onto something. I guess father does know best.


++++++

ALMOND, PINE NUT AND APRICOT CRUMB CAKE
Adapted from Giada De Laurentiis' recipe

1/2 c. whole almonds, toasted

1/4 c. sliced almonds, toasted

1/2 c. pine nuts, toasted

1 1/4 c. all-purpose flour

1 t. baking powder

1/2 t. kosher salt

4 eggs

1 1/4 c. sugar

1 1/2 sticks butter, melted

1/3 c. milk

1/4 t. pure almond extract

1/2 c. dried apricots, diced


Preheat oven to 350 degrees Fahrenheit. Butter and flour a 9-inch cake pan.

Toast the whole almonds, sliced almonds and pine nuts on a cookie sheet for 6-8 minutes, taking care not to burn them. Remove from the oven and let them cool.


Combine the whole almonds and 1/4 c. of the pine nuts in a food processor. Pulse the machine until the nuts are finely ground. At this point, your kitchen will smell marvelous. Transfer the nuts to a medium bowl. Add the flour, baking powder and salt. Whisk to combine and set aside.

In a medium bowl, using an electric mixer beat the eggs and the sugar until the mixture becomes thick and pale yellow. Beat in the butter and milk. Stir in the almond extract and apricots. Stir in the dry ingredients.


Pour the batter into the prepared cake pan. Sprinkle the top of the cake with sliced almonds and the remaining 1/4 c. of pine nuts.


Bake until the cake is cooked and a toothpick comes out clean, about 50 minutes. Let the cake cool on a wire rack. Use a knife to loosen the edges. Turn the cake out, slice and serve.


Serves 8. Good at all hours of the day and night!

Tuesday, May 13, 2008

So, cream of mushroom soup it will be, at least until the mercury climbs above 50

I know, I know.

Fall is the time for soup. Winter is the time for soup. Those months where the whipping winds and falling leaves and blustery snow make you retreat into your toasty kitchen, where you can hover over a big ol' pot of simmering something until your taste buds and tummy and soul are warmed to a degree inversely proportionate to the temperature outside.


But it's spring now. And I still want soup. I should be craving things like asparagus, and arugula, and delicate buttery lettuces. Maybe a spring onion or two. But here I am, desiring cream of mushroom soup -- a dish I find nearly synonymous with Thanksgiving. I think it has to do with all the chilly, rainy days we've been having here, which are helping the grass sprout an unbelievable green and the irises seemingly grow before my very eyes and the huge lilac outside my kitchen window explode with its fragrant lavender blossoms. But that same chill made me sleep in my robe last night, then turn on the furnace around 1:30 a.m. when the blanket and 100-pound Chesapeake Bay Retriever were not enough to keep my toes warm.

So, cream of mushroom soup it will be, at least until the mercury climbs above 50 for a few days in a row.


The cream of mushroom soup that I turn to is the one my mother has been turning to for decades. The recipe is from Helen Corbitt's Cookbook, a delightful little unassuming book that looks more like a well-loved hardback novel sitting on the shelf. No full-color luscious photography; no stacked up trendy food. Just classic recipes printed on yellowing pages that are splattered here, crinkled there from years of heavy use. It even has cute little mushrooms on the spine!


Mom purchased the book at the behest of our dear friend Luta, the consummate hostess. In fact, nestled in the cookbook on page 258, opposite Helen Corbitt's Fruit Cake, is a letter dated December 17, 1976, from Luta that details her modifications to the fruit cake recipe -- modifications Luta herself learned from her mother. The letter also makes reference to an event that is legendary in my family's history: the time we were visiting Jack and Luta in Texas and Sister, then about nine years old, wrote on a piece of paper in a very heavy hand, "All ladies are sick and ugly." Apparently Mom and Luta were talking, and Sister wanted attention because whatever they were discussing did not involve her. So she scrawled that ugly missive, pressing so hard with the pen that her statement became engraved in the wood of the table, for all eternity. Luta took it in stride; she knew just why Sister was behaving so hideously. Once again, a simple cookbook holds evidence of a colorful family history and a long-standing nostalgic joke within its pages.


But on with the mushrooms! This woodsy, earthy soup is more than enough to make you happy whatever season it is, whatever the weather might bring. It is rich and "meaty" -- though I am often at a loss why people describe mushrooms as "meaty," here they do provide a lovely robust mouth-feel. The soup is fortified with a shot of sherry, which is that je ne sais quoi that makes this soup truly remarkable. Aside from the time is takes to finely chop the mushrooms, you'd never guess you could make this soup in less than an hour. Barely more time than it takes to open and reheat a can of Campbell's. It really does taste like it's been simmering all day long, perfecting itself while you curl up under the afghan with a good book.

Hurry up. Indulge yourself with some good old-fashioned cream of mushroom soup before it gets too hot that all you want to eat are fresh tomatoes. Don't get me wrong: those Tomato Days are glorious. But there is a time and a place for mushrooms, too. And as the thunder rolls in tonight, the mushrooms' place is with me.


++++++

CREAM OF MUSHROOM SOUP
Adapted from Helen Corbitt's Cookbook


Helen's recipe serves four, but I've doubled that recipe because, really, who wants just four servings? The divine Ms. Corbitt suggests that you strain this soup to remove the mushroom and onion bits, a step that I find too fussy for my taste. I went through the effort of finely chopping those mushrooms -- for goodness sake, I'm going to eat them.


8 T. butter

4 t. onion, finely chopped

1/2 lb. fresh button mushrooms, finely chopped

1/2 lb. cremini mushrooms, finely chopped

2 quarts (64 oz.) chicken stock

4 T. flour

2 t. kosher salt

2 c. half-and-half

4 T. dry sherry


Finely chop the onions and mushrooms; set aside.


Melt 4 T. of the butter in a large, deep skillet or dutch oven. Add the onion and saute until soft, about 2 minutes. Add the mushrooms and saute for about 4 minutes, until the mushrooms begin to release their moisture.

Add the chicken stock, cover and let simmer over low heat for 15 minutes.

Melt the remaining 4 T. of butter in another deep skillet or dutch oven. Add flour and salt, whisking thoroughly; cook for about 3 minutes to get rid of the raw flour taste.

Using a ladle, add the mushroom mixture to the flour mixture, whisking the first few ladle additions to dissolve the roux into the mushroom mixture. Add the half-and-half, stirring to incorporate. Add the sherry and cook for an additional 5 minutes or so. If you so choose, strain the soup through a wire mesh strainer. I do not so choose.

Serve hot!

Makes 8 servings.

Thursday, May 8, 2008

You can understand why I cherish these pages

Is it possible to be emotionally attached to a cookbook?

If you are anything like me, the answer is, why, yes.


Though I am in love with many of the luscious, gorgeous, hardbound volumes that comprise the "cookbook" section of our library, there is only one that sums up my entire childhood between its torn, frayed, disintegrating covers: Betty Crocker's Cooky Book.


Originally published in 1963, the Cooky Book is a trove of delectable, old-fashioned cookie recipes mixed with the sort of delightful, simplistic nostalgia that only a cookbook penned in the 1960s can offer. For example, the letter from the fictional Betty Crocker that's printed next to the table of contents includes the following: "In this book you'll find cookies in variety, cherished recipes from the past and recipes using the newest convenience products...." The best 1960s housewife language comes in the introduction to the "Company Best Cookies" chapter:

"Company is coming" is a magic phrase which brings an air of excitement to the house, especially to the kitchen. Often it is these company occasions that prompt us to take the time and effort to bake some delicious delicacy. Here, for the four o'clock hostess, are dainty bars, bonbons, and drops -- perfect complements to fragrant tea or coffee. Among these teatime treasures you'll find cookies with the distinctive flavors and shapes of foreign lands. Here, too, for hostesses at big affairs, is a variety of cookies to make in quantity. Yes, cookies lend themselves beautifully to easy friendly hospitality. Baked, and even arranged ahead of time, cookies can always be ready to tempt and please your guests.
....

Afternoon tea is a gracious and elegant way to entertain your friends with ease and at a small expense. Welcome a newcomer to the neighborhood or honor an out-of-town guest at a small tea for twelve. Announce your daughter's engagement or introduce prospective club members at a large tea for fifty or one hundred guests. On these pages are dozens of recipes for fancy, rich, and delicious little cookies to accompany tea and coffee.


Best of all is the chapter devoted to "Best Cookies," which organizes popular cookies by decade, complete with sidebars on historical highlights...starting in the 1880s. Who knew that "The Best Cooky" between 1890 and 1900 was "Cinnamon Jumbles"? And when people were loving their Cinnamon Jumbles at the turn of the century, "a Chinese chef in New York concocted the first chop suey." Seriously, this cookbook is phenomenal.

I am lucky enough to own a first edition/printing volume, one that has been lovingly annotated over the years by both my paternal grandmother and my mom. Ma Chris, my grandmother, wrote some of her (and my dad's) favorite recipes on the inside front and back covers of the book, as well as in the margins of certain pages. I am so grateful to have these recipes at my disposal, after all these years, as they're both a tangible connection to my grandmother as well as a terrific resource when it comes to baking for my dad. Those recipes remind him of his youth and I am always happy to try to recreate some of Ma Chris' magic for him. (Though, sadly, her recipe for raisin-filled cookies -- Dad's ultimate favorite -- is missing something. She forgot to include a key ingredient for the filling and I can't figure out how to make the recipe work properly. Dad continues to lament.)


Inside the front cover Ma Chris jotted down the recipes for "Easy Kolache" ("use same dough for nut rolls"), "Standard White Bread" and "Brown Sugar Raisin Filled Cookies," which is the recipe missing a filling ingredient. On page 103, which features illustrations of ginger cut-out cookies, inside the drawing of the ginger bear Ma Chris has written a simple recipe for ice cream. The inside back cover contains her recipe for "Angel Streudel," which is a delightful cherry-angel food cake roll. I still serve it at Christmas. There's also a recipe for "Caramel Apple Cookie" here. On page 28, the page the Cooky Book dedicates to "Holiday Cookies," Ma Chris has added recipes for Pizzelle, or "Pizzale" as she spells it, "Butter Balls" and "Ginger Creams." The only instruction for Butter Balls is as follows: "Slow oven 10 min."


You can understand why I cherish these pages. And I haven't even gotten to the recipes that are actually printed in the book.

When Mom got her hands on the Cooky Book, she went through and placed discreet Xs next to those cookie recipes that she liked the most. All my very favorite cookies are thus marked with Xs, as my favorites are the ones we baked all the time when I was young: Russian Tea Cakes, Snickerdoodles, Jubilee Jumbles, Chocolate Crinkles. Coconut Lemon Bars even get two Xs, so you have to know Mom loved those. I still turn to these pages on holidays, special occasions, or just the random Thursday that could be improved by a few dozen nostalgic cookies. I turn to them so often that the Cooky Book is falling apart, its pages separating from its wire binding, the front cover completely torn from the rest of the volume. My family always makes fun of me because I am very anal retentive about my books. I get angry if anyone cracks the spine before I've had a chance to read the book (and sometimes even after I've read it). If a book gets wet, or stained, I tend to throw a minor hissy fit. It is not an attractive quality. I'm working on it. However, my copy of the Cooky Book belies my anal retention: it is falling to pieces, and I love it. Proof of the book's exalted status in my kitchen and in my life.


So after Ma Chris wrote part of her baker's story in the margins, Mom, Dad, Sister and I had our turn. Though the Xed recipes got the most play in the kitchen of my childhood, several other recipes stand out in my memory. First are Toffee Squares, page 39, described as the "rich cooky that looks and tastes like toffee candy." I entered Toffee Squares into a Girl Scout cookie-baking contest in middle school, and won. I remember making the recipe "my own" by cutting the bar cookie into diamond shapes, rather than squares. I was very proud of this innovation. Then there were the Candy Cane Cookies. The bane of my childhood existence. They just looked so beautiful and delicious in the Cooky Book's photographs.... I always asked to make them. Begged to make them. Mom always said no. Too much trouble! The recipe involves dividing the dough in half, coloring one half red, then rolling out logs of both colors and twisting them together before baking. I never in my life made these cookies, though I have always wanted to. Which is sort of ridiculous because I am 33 and made mole poblano last week. Certainly I can manage Candy Cane Cookies. But that just wouldn't be right: these are the Forbidden Treat. The denial of the Candy Cane Cookies is legendary.


Today I have chosen Chocolate Crinkles to make for you all. I've been thinking about them a lot over the past few weeks and it's been awhile since I've baked them. They are so simple to make -- they're powdered-sugar-covered brownie bites, really. The method involves rolling the cookies into balls and dipping them into the sugar. When we were young Sister used to say, while rolling, "I can taste them with my hands!" While this is not empirically possible, the dense, rich chocolate smell is pleasing enough to sate all five senses.


Even if the Cooky Book was not an integral part of your formative years -- and even if you don't have an aging, tattered copy that is 45 years old -- Chocolate Crinkles should become a part of your baking repertoire nevertheless. Why deny yourself rich, chocolatey gems coated in pristine powdered sugar? I have denied myself Candy Cane Cookies for more than three decades. Don't do the same with Chocolate Crinkles.


++++++

CHOCOLATE CRINKLES
Adapted from Betty Crocker's Cooky Book


Note that this cookie dough has to chill in the refrigerator several hours or overnight. So be sure to allow yourself adequate time.

1/2 c. vegetable oil

4 oz. unsweetened baker's chocolate, melted

2 c. granulated sugar

4 eggs

2 t. vanilla

2 c. all-purpose flour

2 t. baking powder

1/2 t. kosher salt

3/4 c. confectioners' sugar


Melt the chocolate in a heat-proof bowl set over gently simmering water. After it's melted, allow the chocolate to cool slightly.


In a large bowl and using a rubber spatula or wooden spoon, mix the vegetable oil, melted chocolate and granulated sugar. Blend in the eggs, one at a time, incorporating each completely before adding the next. Stir in the vanilla. Add the flour, baking powder and salt to the bowl and mix thoroughly.


Cover the bowl with plastic wrap and chill several hours or overnight.

Later or the next day, preheat the oven to 350 degrees Fahrenheit. Using a teaspoon or a small ice-cream scoop, drop the chilled dough into a shallow bowl or plate containing the confectioners' sugar. Roll the dough in the sugar, then roll the sugar-coated dough between your palms to form a ball and shake off excess sugar. Place the cookies about 2 inches apart on a Silpat-lined, or greased, baking sheet.


Bake for 10 to 12 minutes, taking care not to over bake! Leave the cookies on the baking sheet for about a minute after removing them from the oven. Then remove to a wire rack to cool.


Then, taste them with your hands, or with your mouth. Personally, I advocate for the latter.

Makes about 44 cookies. Best enjoyed with a tall glass of milk!

Sunday, May 4, 2008

Grocery store cashiers will wonder what you're doing with all those dried peppers

Among the great sauces of the world, I do believe mole might be one of the finest -- if not the finest. While the world "mole" technically refers to many sauces found in Mexican cuisine, the mole of which I speak is formally called "mole poblano" -- an intoxicating blend of chile peppers, spices, sesame, almonds and Mexican chocolate, among many other varying ingredients. In English mole poblano is often shortened to just "mole," which is how I encounter it on most Mexican restaurant menus. So the mole I'm talking about when I talk about mole, which is often, is mole poblano.


Good. With that out of the way, let me sing mole's praises. There is so much I could say about this glorious sauce. I could talk about Martha, one of the many exchange students who lived with my family when I was growing up. She was from Oaxaca -- the Mexican state that, next to the state of Puebla, is a sort of ground zero for mole preparation -- and she was a riot. Once, in the grocery store, she spied a pyramid of mangoes in the produce section and inquired of my mother, quite gravely and purposefully, as though the fate of the world hinged on the answer, "Can we buy the mango?" Though I don't recall discussing mole with Martha, I am relatively certain that it was a part of her diet at home.

I could talk about my dad, who constantly refers to mole as "chocolate sauce," as if I am slathering my enchilada with Magic Shell.


I could talk about Rick Bayless, chef, restaurateur and foremost expert on Mexican cuisine, whose recipe follows. Rick's two Chicago restaurants, Frontera Grill and Topolobampo, are amazing. If all the restaurants that I love were stacked on top of each other like some sort of culinary pyramid, Frontera Grill would be the summit. I am not exaggerating. Not a bit. When I lived in Chicago, a night at Frontera Grill was a treat indeed. It was worth the wait in line to sample Rick's fare, which brings authentic Mexican dishes to the heart of Cook County, Illinois. Once my mom, sister and I were sitting in the bar area, enjoying brunch, when Mr. Bayless himself emerged from the kitchen and sat down at a high top for what seemed to be a business meeting. Mom, who is not shy, decided that she could not go on if she did not introduce herself to Rick. Sister and I implored her not to interrupt his certainly important meeting. Our pleading fell on deaf ears as Mom pushed back from the table and strutted over to the chef to tell him how much she loved his food. Though Sister and I hid in shame behind our chilequiles, Rick was very gracious. If he was annoyed, he did not show it at all. This "incident" is and will always be known as That One Time Mom Stalked Rick Bayless.

(I have a story about Rick's brother, Skip, too. He used to be a sports columnist for the Chicago Tribune. However, this story has nothing at all to do about food and instead pertains to my husband's career and the Chicago Cubs, so, I shall leave well enough alone. I choose to revel in the glory of only one Bayless brother, and it is not Skip.)

Or I could talk about the mole you can buy in a jar in the supermarket, which is tasty to be sure but comes packaged in a glass jar with a crimped metal lid that is nearly impossible to open safely. Yes, using pre-packaged mole is a good way to enjoy the delicious flavor without the time and effort required to make the sauce from scratch. It is also a good way to injure yourself, as you attempt in vain to uncrimp the metal lid and free the mole within. I once shattered the glass rim of the jar doing this, then spent the rest of the evening picking teeny shards of glass out of my bare foot rather than supping on scrumptious enchiladas with mole. If you make mole yourself, you greatly reduce the chances of blood loss and extreme frustration.

Though I seem to have done a lot of talking already, what I would really like to talk about is the mole itself. For a sauce that looks so rustic and unassuming, its uniform brown color masks a world of subtle, delicate, amazing flavors. It's a little spicy. A little sweet. A little bitter. A little nutty. A little chocolatey. But not milk chocolatey; rather, Mexican chocolatey -- the essence of good dark chocolate mixed with the singular aroma and flavor of cinnamon. Mole elevates chicken or turkey (or whatever you choose to smother with it) to a rarefied place indeed. My favorite mole application is over cheese enchiladas spiked with black olives and scallions. The gooey cheese and substantial corn tortillas, punctuated by the occasional fresh crunch of the scallion, provide a magnificent delivery system for the wonderful sauce. But don't stop at enchiladas: there are many delicious ways to enjoy mole.


In the interest of full disclosure, I feel it's important to state that making mole from scratch is not the simplest, or quickest, or cheapest endeavor. The sauce is complex and requires a range of ingredients, some of which are potentially difficult to find. (I am spoiled by the West Point Market, which carries most of the components needed for mole, but if you are not so lucky as to be near a gourmet market you can always find those more challenging ingredients online.)

Mole takes time. Rick Bayless advocates allowing four days to make the dish, which even I find excessive. It's much more reasonable to shave that time in half: do the prep work and frying the night before you want to serve it, then the flavors can meld overnight and the sauce can be pureed and cooked the next day. That way, you are not crazy and chained to the stove on the day you wish to serve the mole. So, yes, one must sacrifice a chunk of time to the process, but I can think of few greater sacrifices than to give a day or two in the service of great homemade mole. Think of it as an adventure: grocery store cashiers will wonder what you're doing with all those dried peppers. Friends and family will be duly impressed by your ambitious undertaking. Oh, and of course, there is the delicious result.

Finally, mole can be on the expensive side -- unless you have a good source for bulk dried chiles. For a dish that is so common in Mexico, that is so frequently made by people of modest means, it is somewhat ironic that the ingredients are expensive to the home cook in the U.S. The dish requires a lot of dried chiles, which are not necessarily cheap. But think of it as an investment. You are expanding your culinary repertoire in new and exciting ways -- and it's not like you're making mole every night, or even every week, or even every month.

That said, May is a good month to make mole. So celebrate Cinco de Mayo -- a holiday which, at its core, celebrates the 1862 Battle of Puebla -- with a homemade batch of Puebla's own mole poblano. ¡Feliz Cinco de Mayo!


++++++

MOLE POBLANO
Adapted from Authentic Mexican, by Rick Bayless

In his infinite wisdom (and it is indeed infinite), Rick says, "Even with all the huge mounds of prepared mole pastes available in the Puebla market, many of the...restaurant cooks still insist on preparing their own from scratch....It's a remarkable dish. And it's worth the effort."

He also mentions that mole poblano should always be served as part of a fiesta or celebration. Rick suggests three beverages to serve as accompaniments: a dry red wine such as Zinfandel, malty Dos Equis beer or limeade. Sign me up.

A few more notes: Rick states that the variety of chiles is the most important component of this dish; it's more critical than the chocolate. So if you can't find Mexican chocolate, substitute 2 T. unsweetened cocoa. Then go focus your energies on procuring the right chiles. Also, if you are planning on making this recipe over two days, complete the following steps the night before: roast the tomato; seed and stem the chiles; toast the seeds; fry the chiles but do not reconstitute them; and fry the almonds, raisins, onions, garlic, corn tortilla and bread. Cover the chiles with plastic wrap and leave them at room temperature. Cover the tomato mixture with plastic wrap and refrigerate. The next day, reconstitute the chiles and resume the recipe at the pureeing steps.


The chiles:

About 8 oz. dried chiles mulatos

About 2 1/2 oz. dried chiles anchos

About 2 oz. dried chiles pasillas

1 canned chile chipotle, seeded

The nuts, seeds, flavorings and thickeners:

1/4 c. sesame seeds, plus a little more for garnish

1/2 t. coriander seeds

1/2 c. vegetable oil, plus more as needed

Heaping 1/3 c. (2 oz.) unskinned almonds

1/3 c. raisins

1/2 medium onion, sliced

2 cloves garlic, peeled

1 corn tortilla, stale or dried out

2 slices firm white bread, stale or dried out

1 large ripe tomato, roasted, cored and peeled OR 3/4 of a 15-oz. can of tomatoes, well-drained

The spices:

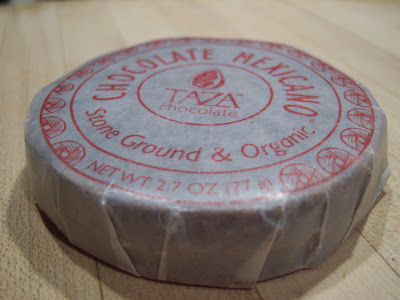
About 2 oz. Mexican chocolate, roughly chopped

10 black peppercorns

4 cloves

1/2 t. aniseed

1-inch cinnamon stick

To finish the dish:

1/4 c. vegetable oil

About 2 1/2 quarts poultry broth, preferably turkey

About 2 t. kosher salt

1/2 c. to 1 c. sugar


Set up the ingredients. "As with any recipe calling for [23] different ingredients, half the battle is won by getting yourself properly set up." So true, Mr. Bayless. So true.


Roast the tomato. Place a piece of aluminum foil in a dry skillet or on a dry griddle, then place the tomato on the foil over medium heat. Turn it occasionally for about 15 minutes, depending on the size and ripeness, until the flesh is soft and the skin is blackened and blistered. Cool, peel away the skin and cut out the core. (If you choose to use canned tomatoes, skip this step.)

Stem, seed and devein the dried chiles, reserving 2 t. of the seeds. Tear the chiles into flat pieces. This is probably the most time-consuming step of the whole endeavor. I find it easiest to pull the stems off the chiles gently but firmly -- cutting them if they are stubborn and/or brittle. Then tear the pepper in half and brush/pick off the seeds. If you see any dried veins, pull them off. But it's possible that you won't be able to get a handle on all the veins; that's OK, just leave them there. A word to the wise: wash your hands well before you touch your face, or pet the dog, or blow your nose. Because they're dried, it's easy to forget that these chiles pack some heat. Seed the chipotle and set it aside.

Measure the sesame seeds, coriander seeds, almonds and raisins into separate mounds or small dishes. Set aside. Slice the onion and peel the garlic cloves; set aside. Lay out the corn tortilla and bread.

Place the tomato in a large bowl and break it up using your hands. Add the chopped chocolate to the tomato. Pulverize the black peppercorns, cloves, aniseed and cinnamon stick using a mortar and pestle or a spice grinder. Add the ground spices to the tomato and chocolate mixture.


Toast the seeds. In a medium-sized dry skillet placed over medium heat, toast the reserved 2 t. of chile seeds, sesame seeds and coriander seeds, one at a time, stirring each until lightly browned. Add each batch of toasted seeds to the tomato mixture.

Fry and reconstitute the chiles. Measure 1/4 c. of the vegetable oil into a large skillet over medium heat. When the oil is hot, fry the chile pieces a few at a time for several seconds per side, until they develop a nut-brown color. This happens quickly, so you'll have to work fast. Add more vegetable oil if the pan gets too dry. Take care not to burn the chiles! Remove them to a large bowl, draining as much oil as possible back into the skillet. Cover the chiles in the bowl with boiling water, weight them down with a plate to keep them submerged and soak them for at least 1 hour. After the hour has elapsed, drain the chiles and add the chipotle to them.

This step is smoky and pungent; make sure the stove's exhaust fan is on!

Fry the almonds, raisins, onion and garlic. In the same skillet you used to fry the chiles, heat the remaining 1/4 c. of vegetable oil over medium heat. Add the almonds and stir frequently until they're browned, about 4 minutes. Remove, draining well, and add to the tomato mixture. Fry the raisins for about 1 minute, stirring constantly, until they're puffed and brown. Scoop them out of the skillet, draining, and add them to the tomato mixture. Cook the onion and garlic, stirring frequently, until well-browned, about 8 to 9 minutes. Remove from the skillet, draining, and add to the tomato mixture.


Fry the corn tortilla and bread. If needed, add a little more oil to the same skillet. Fry the corn tortilla until it's browned, then break it up and add to the tomato mixture. Lay the bread in the pan, then flip both pieces over to coat both sides with oil. Brown the bread on both sides. Tear the bread into large pieces and add to the tomato mixture.

Puree the tomato mixture. Stir the tomato mixture thoroughly and scoop about 1/4 of it into a blender along with 1/2 c. turkey broth. Blend until smooth, adding just a little bit more broth if the mixture won't move through the blades. Strain through a medium-mesh sieve into a large bowl, using a rubber spatula to push the mixture through. Puree the 3 remaining batches, adding 1/2 c. broth to each batch; strain.

Puree the chiles. Puree the drained chiles in 3 batches, adding about 3/4 c. of broth (or more, if needed) to each batch. Strain through the same medium-mesh sieve into a separate bowl. Straining the tomato mixture and the chiles is a time-consuming process, but be patient. It's important to separate the smooth sauce from the chile skins and larger pieces of nuts and seeds.


Fry and simmer the sauce. Coat the bottom of a dutch oven with vegetable oil. Heat the oil over medium heat for about a minute, then add the chile puree and stir constantly with a whisk until it's thick, about 5 minutes. Add the pureed tomato mixture and stir several minutes longer, until the mixture thickens once again. Mix in 5 c. of turkey broth, partially cover the pot, reduce the heat to low and simmer gently for about 45 minutes. Stir the sauce occasionally. Finally, season with kosher salt and sugar and, if the sauce is thicker than heavy cream, thin it with a little more broth. You might have to add more sugar than you think would work, to offset bitterness from the peppers. Keep tasting and adjusting until the sauce is only a teeny bit bitter. It should have a nice balance of spice, sweetness and bitterness.


Congratulations! You have made mole. Pat yourself on the back, then decide how you'd like to serve the sauce.

If you would like to serve it over enchiladas, as I typically do, begin by preheating the oven to 350 degrees Fahrenheit. Lightly fry about 8 corn tortillas in a little bit of vegetable oil in a skillet. Remove a few ladels of mole to a shallow bowl, then drag the fried tortillas through the mole, coating them with sauce. Place about 2 T. each grated cheddar and monterey jack cheese in the center of each tortilla, sprinkling the cheese mixture with sliced black olives and sliced scallions. Roll up the enchiladas, place them in a baking dish, then spoon mole over them. Scatter more cheese on top of the enchiladas. Bake at 350 degrees Fahrenheit for about 15 minutes, until they are heated through and the cheese is melted. Serve with an additional sprinkling of fresh scallions and sesame seeds. (Please note: I do not know if or claim that this method of serving mole is at all authentic and traditional. It just happens to be my favorite way to showcase the amazing sauce.)

If you would like to go the poultry route, preheat the oven to 350 degrees Fahrenheit. Saute 4 chicken breasts in olive oil in a skillet until browned on all sides. Remove the browned chicken to a baking dish. Pour the mole over the chicken, cover the pan and bake until the internal temperature of the chicken is 161 degrees Fahrenheit. (I use a digital probe thermometer for this.) Before serving, spoon some sauce from around the edges of the baking dish over the chicken to give it a gistening coat, then sprinkle with sesame seeds. If you are so inclined, you might choose to serve mole with an entire chicken (as opposed to only the white meat), or a turkey. After cutting the bird into breast, thigh, wing and leg pieces, just follow the same browning-and baking technique.

Makes 3 quarts of mole. That's quite a bit of mole, so I freeze it in ice cube trays for use later on down the line.