skip to main |
skip to sidebar
I always say that I love recipes that take at least three days to complete. Think: mole; homemade turkey stock; sourdough bread; pandoro. The more time-consuming and labor-intensive, the better. I even say as much in my little blog manifesto. Convenience is not my thing. I might have some kind of an illness. Please don't judge me.

It is in such a context, then, that my head nearly a'sploded when I saw a recipe for barbecue sauce that called for homemade coffee liqueur. After its ingredients are mixed together, the homemade coffee liqueur takes at least a month to mature, sitting on cool, dark shelf, allowing its component parts to mingle and become awesome. When I began making the liqueur early last December, I actually thought to myself, "Bitchin'. I can have homemade crispy chicken nuggets with coffee-liqueur barbecue sauce in February." And this thought was appealing to me.
As I said, some sort of illness.
Anyway. I realize that you can just use Kahlua to make the barbecue sauce, and that way you can have a finished product a mere hour after you decide to make it. That is a completely reasonable route to take. But if you're like me and you like to imagine what you'll dip nuggets into long after winter is gone and the tulips are blooming, you've come to the right place.

This sauce is dynamite: multi-layered, spicy, sweet, boozy, onion-y. It has depth: the depth that a food should have that was several months in the making. We've really enjoyed it over the past few nights as a dipping sauce for the aforementioned crispy chicken nuggets, which come from Cook's Country and are so good that you will not be able to stop thinking about them (I'm not exaggerating). Of course this barbecue sauce has a million applications that don't involve dipping: baste grilled chicken with it, use it to enliven an everyday turkey sandwich, eat it with a spoon.

As for the remaining homemade coffee liqueur: you can always invite Husband over. He loves "Caucasians." He'll finish it off for you in no time.
++++++
Coffee Liqueur Barbecue Sauce + Homemade Coffee Liqueur
Adapted from Southern Living
A note about ingredients: the homemade coffee liqueur recipe calls for two tablespoons of chocolate liqueur (a la Godiva). If you don't want to buy a whole bottle for two tablespoons, do what I did: ask your favorite bartender or server for a shot from behind the bar. Maybe it says something about me and my relationship with food service professionals, but I had no qualms about asking our favorite Saturday morning breakfast waitress Becky for a shot and she didn't even charge me. Never mind that the people at the next table wondered why I was asking for chocolate liqueur at 8:15 a.m. They can judge all they want.
Another note: the barbecue sauce recipe only makes about one cup of sauce. Frankly, that is not enough. I recommend doubling it; it will keep in the fridge in an airtight container for a week.
For the homemade coffee liqueur:
4 c. sugar
1/4 c. instant espresso
2 c. vodka
2 T. chocolate liqueur (optional)
1 8-inch vanilla bean, split lengthwise
Bring 2 cups of water to a boil in a large saucepan over medium-high heat. Remove from heat, then whisk in sugar and instant espresso, whisking until completely dissolved. Let cool 10 minutes.
Stir in the vodka and chocolate liqueur (if desired), whisking until well-blended. Pour the mixture into a 2-quart glass bottle (or any glass bottle that's large enough and has a lid). Cover tightly with the lid and shake thoroughly.
Let stand in a cool, dark place at least one month, shaking at least once weekly.

After one month, you are ready to make barbecue sauce. Rejoice! This process has taught you the beauty of patience and anticipation.
Makes 6 cups of liqueur.
For the coffee liqueur barbecue sauce:
1 8-oz. can tomato sauce
1/3 c. homemade coffee liqueur (recipe above; store-bought coffee liqueur may be substituted)
1/4 c. red onion, finely chopped
2 T. Worcestershire sauce
1 T. freshly-squeezed lemon juice
2 t. all-purpose flour
1/2 t. kosher salt
1/4 t. chili powder
1/4 t. crushed red pepper flakes
In a medium saucepan, whisk together all ingredients. Bring to a boil over medium heat; reduce heat to low and simmer, whisking occasionally, until the sauce is slightly thickened, 5 or 6 minutes. Cool completely before serving (about 30 minutes).

Makes 1 cup of barbecue sauce.
++++++
Previously, on A Stove With A House Around It:
One year ago: layered chocolate fudge cake
Two years ago: baklava
Three years ago: tomato sauce di Piazza Sant'Eulalia
OK, so technically A Stove With A House Around It is three years and one month old.
My goal was to celebrate the old girl's third birthday in a more timely fashion, like, on the birthday itself (January 10, 2011). But it's February 13 and I'm just now getting around to acknowledging the milestone. What can I say; I am lame. But I am not so lame that I didn't bake pretzels in honor of the occasion!

For the site's first and second birthdays, I made pretzels. I decided it should be an annual thing: The Ritual Baking of the Pretzel in Honor of the Weblog's Birthday. Last year I wrote, "Yes. I believe I shall make birthday pretzels a yearly tradition: each year this blog grows a little older, I'll share another pretzel recipe I've found. Because I do believe a full life is one lived in the presence of many pretzel recipes." And I'm nothing if not true to my word.

And so! How fortuitous that I spent so much time during my maternity leave catching up on magazines that had been sitting on the shelf, languishing, for years. And how fortuitous to come across, in the course of this culinary publication backlog-clearing endeavor, an article in a five-year-old Food & Wine about the homey side of Grant Achatz, titled "Comfort Food from a Rebel Chef." "I've always been a fan of any food high in salt and starch," the adorable little molecular gastronomer says, "and soft pretzels right out of the oven are awesome."
Hey, if they're good enough for the man behind this, they're good enough for me.

I'm pretty psyched about the blog's turning three, even if I can't post as often as I used to, or as often as I'd like. It's still a labor of love, and I hope that a few of you out there find inspiration or humor from this space -- or maybe just a way to pass a little time. Thank you for stopping by, and here's to year four!
P.S. If you were wondering if I had mentally ranked the anniversary pretzel recipes from 2009, 2010 and 2011, well yes, I have. These Achatz beauties are clearly number one, followed by Alton Brown's from last year and Martha Stewart's from 2009. I wonder what next year will bring!
++++++
GERMAN SOFT PRETZEL STICKS
From Grant Achatz's recipe as it appeared in Food & Wine
Though Mr. Achatz says he likes to eat these pretzels with ranch dressing (?), I'd go for a bit of mustard or just plain. They are delicious all on their own.
1/2 c. light brown sugar
2 c. warm water
4 1/2 t. instant yeast (or 2 envelopes active dry yeast)
1/4 c. vegetable oil
5 3/4 c. all-purpose flour (plus more, potentially, for kneading)
3/4 c. baking soda
1 large egg beaten with 1 T. water
Maldon salt, for sprinkling
In a large bowl, stir the brown sugar into the water until it dissolves. Sprinkle the yeast over the water and mix in with a whisk; let stand for about 5 minutes. Stir in the vegetable oil and 3 cups of the flour. I use my dough whisk to bring the dough together, but a wooden spoon will work just fine. Knead in the remaining 2 3/4 cups flour; the dough will be slightly sticky.
Transfer the dough to a lightly-floured work surface and knead until the dough is silky, about 3 minutes. If the dough is very sticky, knead in up to 1/4 cup more flour. (I did not need to use any extra flour.) Transfer the dough to a large oiled bowl, cover with plastic wrap and let stand at room temperature until doubled in bulk, 45 minutes to an hour.
Preheat the oven to 450 degrees Fahrenheit. Line three large baking sheets with parchment paper and spray with cooking spray. Punch down the dough and turn it out onto a work surface. Knead the dough lightly, then flatten it out and, using a bench scraper, cut it into 24 pieces.

Roll each piece into an 6-inch stick about 1/2-inch thick. Transfer the sticks to the prepared baking sheets, leaving about 2 inches between them. Let stand uncovered until puffed, about 25 minutes.
In a large, deep skillet stir the baking soda into 2 quarts of water and bring to a simmer over high heat. Reduce the heat to moderate. Using two slotted spoons or spiders, carefully transfer 6 pretzel sticks at a time to the simmering water for 30 seconds, turning once. Transfer the sticks to paper towels to drain, then return them to the parchment-lined baking sheets, spacing them as before.

Brush the pretzel sticks with the egg wash and sprinkle with salt. Bake until richly browned, about 10 minutes. Serve warm or at room temperature.

Makes 24 pretzel sticks. The sticks can be stored in a plastic bag overnight then reheated in a toaster oven the next day, but they are never as good as they are right out of the oven. So, prepare to gorge yourself on pretzel sticks or invite a few people over for snacking.
++++++
Previously, on A Stove With A House Around It:
One year ago: layered chocolate fudge cake
Two years ago: pine nut cookies with rosemary
Three years ago: egg rolls
"I could see why Seinfeld would steal one of those," Husband said.
He was, of course, referring to the time Jerry stole a marble rye from Mrs. Choate in order to sneak it into the Ross house so George could replace the one his parents took back when Mr. and Mrs. Ross didn't serve it with dinner. "Shut up, you old bag!" Jerry shouted, tucking the swirled rye under his arm.

Though I would consider committing a crime in order to procure a marble rye, now I don't have to, thanks to Peter Reinhart. Which is good for many reasons, not the least of which is: should I ever be brought up on some charges related to a Good Samaritan law in New England, the prosecution won't be able to haul any marble rye-spurned old ladies before the jury to disparage my character.
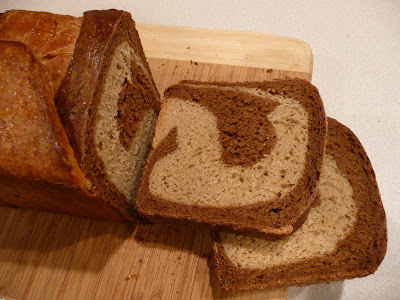
The most difficult part about making this bread is getting your hands on the specialty flours. Well, it's not difficult, per se, it just involves a bit of planning. To achieve the bread's lovely dark-light mottling -- as well as the distinctive, wonderful rye flavor -- you'll need white rye flour, clear flour and caramel coloring. Thanks to the ever-stellar King Arthur Flour, these flours are only an Internet order and a few days' wait away. (For the record, Reinhart's recipe calls for liquid caramel color to dye the dark portion of the marble rye. King Arthur Flour only had the caramel powder. It worked just fine and didn't leave behind any of the bitter flavor that coloring the dough with cocoa or instant coffee would.) The day I ordered my flour I decided that I would spoil myself and load up on all the specialty flours I'd need for the remainder of the Bread Baker's Apprentice challenge. The following bounty arrived on my front porch 72 hours later. You don't necessarily have to be this ridiculous, but I'm not gonna lie: it was glorious. And yes, I lined them all up on my counter like the massive nerd that I am.

Of my two-loaf yield, I ate one marble rye right away and stashed the second in the freezer for a snowy day. The crust was shiny and rich, with a sturdy but soft crumb inside. I usually enjoy thick-sliced and dark-toasted bread, but the marble rye was very tasty cut thinly and toasted lightly. Like seemingly everything else in my life, I loved this bread even more with a little bit of fancy salted butter.

And because I baked it myself, I didn't have to fish for it out the bedroom window of my in-laws' townhouse. Hey, it's a Schnitzer's.
++++++
The Bread Baker's Apprentice challenge asks that we do not share Reinhart's recipes on the dot-com. Meanwhile, you don't need it anyway, because you've already purchased the book. (And if you haven't done so yet, go do it now. I'll look the other way and pretend you've had it all along.) The marble rye recipe starts on page 183.


I've submitted these marble rye loaves to Yeastspotting because they are so lovely, if I do say so myself.
++++++
Previously, on A Stove With A House Around It:
One year ago: layered chocolate fudge cake
Two years ago: graham crackers
Three years ago: whole-wheat spaghetti with Meyer lemon, arugula and pistachios
Husband always says that he has a particular knack for getting at the same result many different ways. Many ridiculous, circuitous, absurd ways. He likes to make simple things difficult for no discernible reason. For example, he used to think that Pepsi Blue (remember that?) tasted like Southern Comfort. So instead of mixing himself a normal Southern Comfort and Coke, he'd mix Southern Comfort and Pepsi Blue to create something he referred to as "even more Southern Comfortable." He's the kind of man who would attempt to cook a piece of chicken on his carburetor when there's a Weber set up 10 feet away. And the most fun thing ever, according to him? Viewing downloaded television shows saved on a spare computer, shared on a wireless network, via the Xbox. So much better than just watching the show when it aired.
I suppose that 15 years with the fellow has taken its toll on me, though, because a few weeks ago I read a recipe for something called "Cannelloni, straight up," which was a randomly difficult, vertical method for serving the large pasta tubes. I mused, "That's right! Why should I eat plain old reclining cannelloni? How boring is that, when I can balance them next to each other, perpendicular to the pan, for extra fun and excitement?"

It was so fun that I made it twice in two weeks. I should also mention that it was delicious, with its vegetable-heavy, slightly sweet sauce (that reminds me a little of this) and its rich cheese cloak and its crusty, baked, almost-burned edges and bits. It's a big mess on the plate, but it looks gorgeous in its baking dish, symmetrical and bubbly and golden. It is effort for no reason. Except that the reason is, because it's fun and new and different and who couldn't use a little of that on a freezing, run-of-the-mill January Wednesday?

No word on whether it goes with a Southern Comfortable.
++++++
CANNELLONI, STRAIGHT UP
Adapted from "The Australian Women's Weekly"
Needless to say, you don't have to prop the cannelloni up if you don't want to. You can make "Cannelloni, prone" if you want. I won't tell anyone and it will still be delicious.
I like the cannelloni made by Molisana. It's cut straight on the ends, which makes it possible to stand on end in the baking dish (as opposed to angled ends). And, according to Molisana's Web site, it's the "eternal protagonist of banquets." Tell me, how could you go wrong with that?!
Finally, feel free to make this dish with ground beef instead of ground turkey.
The filling:
1/4 c. extra-virgin olive oil
1 large white or yellow onion, finely chopped
4 cloves garlic, minced
2 medium carrots, finely chopped
2 celery stalks, finely chopped
1 lb. ground turkey
2 15-oz. cans diced tomatoes
3/4 c. tomato paste
4 c. water
2 t. dried oregano
1 c. fresh flat-leaf parsley, chopped
Salt and pepper, to taste
The cheese sauce:
4 T. unsalted butter
1/3 c. all-purpose flour
3 c. whole milk
1 c. Pecorino cheese, grated
Pinch of grated nutmeg
Salt and pepper, to taste
To assemble the dish:
1 1/2 lbs. cannelloni
1 c. mozzarella cheese, grated
2 T. Pecorino cheese, grated
First, make the filling. Heat the olive oil in a large saucepan. Add the onion, garlic, carrot and celery and cook over low heat until the vegetables are soft. Remove the vegetables from the pan, transferring into a bowl. Set aside.
Add the turkey; cook, stirring, over medium-high heat until the meat is browned, breaking up any lumps.
Return the reserved vegetables to the pan with the cooked turkey. Add the tomatoes, tomato paste, water and oregano and bring to a boil. Reduce the heat and simmer, partially covered, for about 1 hour. (While the filling is cooking, make the cheese sauce, below.) The sauce will thicken slightly. Remove from heat. Add the parsley and season to taste with salt and pepper.

While the filling is cooking, make the cheese sauce. Melt the butter in a medium saucepan over medium-low heat. Add the flour; whisk together with the butter and cook for a few minutes to remove the raw flour taste. Gradually whisk in the milk, whisking constantly until the sauce boils and thickens. Remove from heat and stir in the cheese and nutmeg. Season to taste with salt and pepper.
Preheat the oven to 350 degrees Fahrenheit and assemble the dish. Spoon a quarter of the filling into a Dutch oven, or any oven-proof pan deep enough to accommodate the "height" of the cannelloni tubes. Gently press the uncooked cannelloni tubes upright into the filling.

Gently spoon the remaining filling into the tubes. (I find it easiest to pour the filling in a few installments over the top of the tubes, smoothing it out with a spoon which forces it down into the tubes.)

Pour the cheese sauce over the cannelloni. Sprinkle with mozzarella and Pecorino.

Place the Dutch oven on a baking sheet and bake, uncovered, for about 40 minutes, until the cannelloni is tender and the cheese is golden, brown and bubbly.

Cool for about 10 minutes before serving in a messy but happy heap on your plate.

Serves 6-8.
++++++
Previously, on A Stove With A House Around It:
One year ago: caramel corn with pecans
Two years ago: spaghetti brownies
Three years ago: dukkah
When I was in high school, I was the show choir accompanist. I was nowhere as cool as the piano player with the beard in "Glee" who Husband loves, but I was pretty hardcore nevertheless. For example, I totally got mono from my boyfriend one December, during the show choir's busy season. I remember sitting at a baby grand at a country club somewhere robotically playing "Here Comes Santa Claus" while the choir director waved her hand in front of my face, trying to get my attention. I was really sick, but I would not stop. Must. Play. Christmas songs. And. Showtunes. At. All. Costs.

Anyway. Every so often I'd get to come out from behind the piano. One Christmas, the choir gathered in a charming vignette to sing an a capella version of "Have Yourself A Merry Little Christmas." Several of us were chosen to interject lovely little spoken-word memories of Christmas. While my fellow show choir-ers talked about Santa Claus and gifts and youthful memories and elven magic, when it came my turn I said something like, "I remember coming home from church of Christmas Eve to delicious trays of cookies and coffee."
Yes, cookies and coffee. Baked goods are really important at Christmastime.

We would always bake our Christmas cookies from Betty Crocker's Cooky Book, a tome about which I've gushed effusively in the space in the past. There were always chocolate crinkles, Russian teacakes, jubilee jumbles and lemon squares displayed artfully on a porcelain tray shaped like a Christmas tree. Well, it was artful for a second, but then we got our hands on the tray and all hell broke loose. Powdered sugar everywhere.

And then there were the cream wafers. Too delicate and pretty to be scarfed like the jubilee jumbles, I always thought of the cream wafers as "adult" cookies. They were fancy, and scalloped, and filled with a pastel frosting and coated in a thin layer of sparkling, sandy sugar. They were called "wafers." Clearly too grown-up to be inhaled by the children. For that reason, I hardly ever ate them when I was little. Which is completely ridiculous, you know, because they're just cookies. But in my little head, they were to be relished and savored in a way that demanded a certain maturity.

So now that I'm, like, mature and stuff, I made a batch. And they are amazing. And now I am kicking myself for missing out for so long. Decades lost to inaccurate cream wafer perception. Tragic.
Just think how compelling my spoken-word show-choir vignette contribution would have been had I been eating the cream wafers.

++++++
CREAM WAFERS
Adapted from Betty Crocker's Cooky Book
The note in the book says, "Delicate pastry-like rounds with a rich filling. A lovely addition to the cooky trays for a tea or reception." Indeed. The dough bakes up almost like puff pastry, to the point that you have to dock it to prevent too much rise. Dainty and charming and melty on the tongue. Divine.
The dough has to chill for at least an hour, or overnight if you like. And if life gets in the way and you don't get back to your cream wafer dough for a few days, don't worry. The dough really can hold in the refrigerator for up to 3 days.
The wafers:
1 c. unsalted butter
1/3 c. whipping cream
2 c. all-purpose flour, sifted
About 1/2 c. sugar, to roll the cookies
1 batch creamy butter filling (below)
Creamy butter filling:
1/4 c. unsalted butter, at room temperature
3/4 c. powdered sugar, sifted
1 egg yolk (pasteurized, if you are so inclined)
1 t. vanilla
First, make the dough. Place the butter and cream in the bowl of an electric mixer fitted with the paddle attachment. Cream until they are well combined. Add the flour and mix thoroughly. Place the dough in a bowl and cover with plastic wrap; chill at least 1 hour, or up to 3 days.
When you are ready to make the cookies, remove the dough from the refrigerator about 30 minutes before you want to work with it, to allow it to warm up enough to be rolled. Preheat the oven to 375 degrees Fahrenheit.
Place the sugar on a plate. Roll the dough to 1/8" thickness on a lightly floured board. Cut into 1 1/2" rounds, using a fluted cutter if desired. Place the cookies on the plate with the sugar, turning to coat both sides (you might have to press a bit to get the sugar to stick).
Place the cookies on an ungreased baking sheet. Prick the cookies with a fork to "dock" the dough. Bake 7-9 minutes, until slightly puffy.

Remove to a wire rack to cool completely.

While the cookies are cooling, make the filling. In the bowl of an electric mixer fitted with the paddle attachment, combine the butter, powdered sugar, egg yolk and vanilla. Mix until well-combined. Divide the filling in half; tint half with red food coloring and half with green.
To assemble the cookies, sandwich two cookies together with about 1/2 t. of filling.

Makes about 3 dozen filled cookies.
++++++
Previously, on A Stove With A House Around It:
One year ago: cocoa blocks
Two years ago: chocolate-almond saltine toffee
So it's Thanksgiving eve. I put the 16-pound bird in my traditional Ace Hardware five-gallon poultry bucket, poured over the all spice-, ginger- and black peppercorn-spiced brine, and headed to my parents' house to leave it overnight in their "walk-in" (a.k.a. their screened-in back porch, winterized with heavy duty plastic that keeps it around a perfect 40 degrees).
When I got there, Mom and Dad were kicking it old school:


Dad hasn't made pies in years. Years, I tell you. But when I was growing up, he made pies all the time. In fact, his pie and bread exploits inspired my love of baking. I have him to thank for this little obsession of mine, and it was awesome to see him in full effect. (Mom, for her part, was excelling at one of her most valuable skills: MAKING STUFFING.)
I am thankful for Dad and his pies, and Mom and her stuffing. And Husband. And Jet pup. And, perhaps most of all, little Son.
May you all enjoy this holiday with your loved ones and a big pile of delicious food. Happy Thanksgiving!

October 25 can never come fast enough. For October 25 is the day each year when the Mutsus arrive.

Do you know the Mutsu? If you don't, I strongly suggest you make its acquaintance. The Mutsu is a tart green apple, a late-fall beauty whose tangy bite slowly gives way, if stored properly, to a subtle sweetness. She's a glory with which to bake, and a treat to eat. I go a little bit crazy waiting for her each year, counting down the days until the end of October, bypassing the lesser apples that are ready earlier. Then, finally, the cool fall sun rises on the 25th and I know what I must do: get to the orchard and buy a peck or two. And while I'm at it, I better get some for my dad. I didn't get him any this year, and I really heard about it. Had to make a special trip back to the orchard just for him.

The Mutsu is so important to me (well, as important as fruit can be to a person) that people who know me well often give me bags of them for my birthday. I load up my car with them and then take photos. It's a little embarrassing, really, such an abiding love for an apple. But I let my Mutsu flag fly.


Now. Even with all this apple-love -- even though I can easily eat my way through peck after peck of Mutsus, biting off big, tart chunks as I journey toward the core -- I still look for ways to bake with them. I feel that the Mutsu deserves a little diversity; maybe she wants to be tossed together with a little flour, sugar and butter and turned into something sweet, something delectable, something new. When I saw this recipe for apple and cheddar scones I got excessively excited. It was yesterday morning, really early (like 6:30 a.m. early) when I spied it. "Oooh," I thought. "The beer fridge is half-full of Mutsus. And I have that cheddar from Cheddar that the cute old British cheese man was sampling at West Point Market the other day." The freshly-baked scones were out of the oven by the time Husband and Jet meandered downstairs for their breakfast.

Now I know that the only thing better than a Mutsu, is an apple and cheddar scone baked with a Mutsu. These babies are amazing: sweet, tart, savory, buttery, possessing a depth of flavor not necessarily expected from a modest triangular lump of dough. I plan to bake a whole lot of them, until the beer fridge doesn't have any apples in it anymore.
However, please note that I stopped at the orchard again today. So it could be awhile.


++++++
APPLE AND CHEDDAR SCONES
Adapted from The Perfect Finish, by Bill Yosses and Melissa Clark, via Smitten Kitchen
I doubled the recipe, baked half right away and stashed half in the freezer to bake another day (and by "another day," I mean tomorrow). To bake the frozen scones, just place them on a parchment-lined baking sheet and bake for a few minutes longer than the suggested time, keeping an eye on them to make sure they don't burn.
Update: Just baked the batch from frozen, and they're even lovelier and tastier than yesterday. So don't hesitate to pursue the bake-some-now, freeze-some-for-later option.
1 lb. firm, tart apples (like, ahem, Mutsus)
1 1/2 c. all-purpose flour
1/4 c. sugar plus a few more tablespoons for sprinkling
1/2 T. baking powder
1/2 t. kosher salt plus a pinch for egg wash
6 T. unsalted butter, chilled and cut into 1/2-inch cubes
1/2 c. sharp cheddar, shredded
1/4 c. heavy cream
2 eggs
Preheat the oven to 375 degrees Fahrenheit. Line a baking sheet with parchment paper.
Peel and core the apples, and cut each into 16 pieces. Place them in a single layer on the prepared baking sheet and bake until they take on a little color and are dry to the touch, about 20 minutes. Remove from the oven and let them cool completely on the baking sheet. Leave the oven on.

In a medium bowl, sift the flour, sugar, baking powder and salt together. Set aside.

Place the butter in the bowl of an electric mixer fitted with the paddle attachment. Add the cooled apple chunks, cheese, cream and 1 egg. Sprinkle the flour mixture over the top and mix on low speed just until the dough comes together. Do not over-mix. The dough will be very sticky.

Generously flour a work space and place the dough on top of it. Pat the dough into a circle about 1 1/2 inches thick and 6 inches in diameter, adding more flour if necessary. Using a bench scraper or a knife, cut the circle into 6 wedges. Transfer the scones to a baking sheet that has been lined with a fresh piece of parchment paper, leaving at least 2 inches between each scone. (Note: if you're doubling the recipe, divide the dough in half and make 2 6-inch circles, cutting 6 wedges out of each for a total of 12 scones.)

Beat the remaining egg in a small bowl with a pinch of salt. Brush the scones with the egg wash and sprinkle with sugar. Bake until firm and golden, about 30 minutes. Use a spatula to remove the baked scones to a wire rack; cool for 10 minutes before tucking in.

Makes 6 scones. Which is totally not enough.
++++++
Previously, on A Stove With A House Around It:
One year ago: twice-baked cauliflower
Two years ago: ribollita


